DIY(HELICOID)---CONTAX G35 TO M MOUNT CONVERSION
If you hava a Contax G35 lens and want to use it on Leica cameras, all you need is a converted helicoid. You can use our helicoid to replace the original Contax G35 helicoid by yourself.
Step One: Disassemble Contax G35
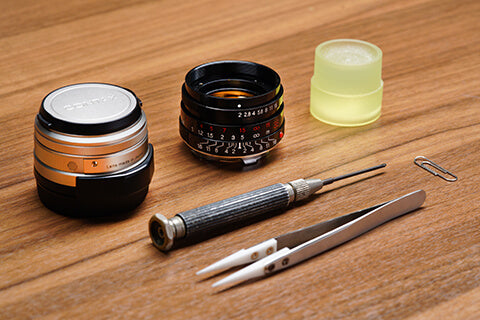
- Preparations before disassembly
(1) Tools list: a screwdriver (Φ 1.0-2.6), a tweezer, paperclips, rubber;
(2) Working environment: try to operate under sufficient light and dust-free environment;
(3) Note: In order to protect the lens, it is recommended to use finger cots or gloves throughout the operation;

- Remove the lens ring from the original Contax G35 lens
(1) Press the rubber against the lens, rotate the rubber and remove the front ring;
(2) Use the screwdriver to remove the 4 screws (do not scratch the lens) and take out the second ring;

- Take out the optical lens group and its gaskets
(1) Tilt the lens downward and take out the optical lens group and its gaskets;
(2) Note: After taking out the lens group, please put the lens group upside down on the table to prevent the rear lens (convex side) from being scratched.

Step Two: Replace the Helicoid
- Assembly list
❶Optical lens group;❷Rubber & 4 screws;❸Helicoid;❹Gaskets;❺Lens rings;❻Tools

- Adjust the aperture and place gaskets
(1) Adjust the aperture to 2.0 and turn the aperture lever to full aperture;
(2) Place gaskets in the helicoid and use a paperclip to align the hole of gaskets with the screw hole of the helicoid.


- Put the optical lens group into M-mount helicoid
(1) Align the aperture lever of the optical lens group with the groove of the helicoid;
(2) With the help of the paperclip, align the optical lens group, gaskets and the helicoid.

- Check and complete the replacement
(1) Adjust the aperture to 2.0, after placing the optical lens group, do not pull out the paperclip during checking;
(2) First install two diagonal screws, then check whether the aperture ring and focus ring are normal, and finally install the other two screws;
(3) Install the lens ring and complete the replacement.

- M-mount cameras infinite focus proofreading
